Your computer works hard every day. When you play games, edit videos, or run heavy programs, your PC’s parts get pushed to their limits. If your computer gets too hot or can’t handle the workload, it might crash or even break. That’s why PC stress testing is so important – it helps you find problems before they get serious.
Stress testing means running special programs that push your computer as hard as possible. This helps you see if your PC can handle tough tasks without overheating or slowing down. We’ve put together this guide to show you the 15 best free tools for testing your computer in 2025.
Why You Need to Stress Test Your PC
Computers today do more work than ever before. Whether you’re gaming, working from home, or creating content, your system faces big challenges. Here’s why testing matters:
- Stop crashes before they ruin your work or gaming
- Find overheating problems before they damage your parts
- Check if overclocking is safe when you want more speed
- Make sure your RAM works properly so you don’t lose data
- See if your cooling system works well enough
- Catch hardware problems early before they get expensive
Regular stress testing can save you money and time. It’s much better to find problems early than to deal with a broken computer later.
For more information about keeping your PC running smoothly, check out our guide on best free registry cleaners for Windows.
Types of Stress Tests You Should Know
GPU Testing
Your graphics card handles all the visual work in games and videos. GPU stress testing makes sure your graphics card can handle heavy loads without overheating or crashing. This is especially important if you play demanding games or work with video editing.
CPU Testing
Your processor (CPU) is like your computer’s brain. CPU stress testing checks if your processor can handle intensive tasks like video encoding, gaming, or running multiple programs at once.
RAM Testing
Your computer’s memory (RAM) stores information while you work. Bad RAM can cause crashes, data loss, and the dreaded “blue screen of death.” Memory testing helps you find faulty RAM before it causes problems.
The 15 Best Free Stress Testing Tools for 2025
1. MSI Afterburner

MSI Afterburner is a powerful program for managing and monitoring your computer’s graphics card (GPU). I’ve used it for over five years, and it’s one of the best tools for keeping track of your GPU’s performance. You can adjust fan speeds, check temperatures, and even record gameplay while testing your GPU’s limits.
MSI Afterburner works with all major GPU brands, like NVIDIA, AMD, and Intel, not just MSI products. Its real-time monitoring feature is great for gamers. It shows GPU temperature, usage, and game frame rates right on your screen while you play. This has helped me avoid overheating problems many times.
The program is excellent for overclocking, which means making your GPU run faster. You can increase the GPU’s speed and memory settings step by step while checking if it stays stable. The tool also shows how these changes affect power use and heat. Always make small changes and test your GPU afterward to avoid issues.
At first, the program’s interface might look complicated, but its basic settings are easy to use for simple monitoring. For those who want more, MSI Afterburner offers detailed graphs and logs to track performance. Whether you’re a casual gamer or someone who loves tweaking your GPU, this tool has what you need.
Key Features
- Tracks GPU temperature and performance in real time.
- Lets you set custom fan speeds or use automatic fan control.
- Supports GPU overclocking with power adjustments.
- Displays performance info during games.
- Records videos and takes screenshots.
- Provides detailed graphs and performance logs.
Pros
- Works with all GPU brands (NVIDIA, AMD, Intel).
- Easy-to-use interface with advanced options.
- Offers complete monitoring and control tools.
- Gets regular updates and has great community support.
- Completely free with no restrictions.
Cons
- It can feel overwhelming for total beginners.
- Some features need technical know-how.
- Overclocking can risk damaging your GPU if not done carefully.
Best for: MSI Afterburner is perfect for gamers, overclockers, or anyone who wants to monitor and control their GPU safely and effectively.
2. HWMonitor

HWMonitor has been my reliable companion for system monitoring during countless stress testing sessions. When you’re running intensive tests on your CPU, GPU, or RAM, you need to keep a close eye on temperatures and voltages. This lightweight tool provides all the essential monitoring data without slowing down your system or interfering with your stress tests.
What I love most about HWMonitor is its simplicity. You don’t need to configure anything – just launch it and instantly see all your system’s vital signs. The clean, organized display shows temperatures for your CPU cores, GPU, motherboard, and storage drives. I’ve caught several potential overheating issues early thanks to HWMonitor’s clear temperature readings during stress tests.
The real-time voltage monitoring is particularly valuable when you’re overclocking or troubleshooting system instability. I’ve used this feature to identify power supply issues and unstable overclocks before they caused system damage. The tool also tracks fan speeds, which helps you verify that your cooling system is responding properly to increased temperatures during stress testing.
While the free version provides all the essential monitoring features, the Pro version adds useful capabilities like remote monitoring and improved graphs. For most users, though, the free version is perfectly adequate for stress testing purposes. HWMonitor works seamlessly alongside other stress testing tools without consuming significant system resources.
Key Features:
- Real-time monitoring of CPU, GPU, and motherboard temperatures
- Voltage and power consumption tracking
- Fan speed monitoring for all system fans
- Minimum and maximum value recording
- Support for modern processors and graphics cards
- Lightweight with minimal system impact
Pros:
- Extremely easy to use with no setup required
- Very reliable and accurate readings
- Minimal system resource usage
- Works with all modern hardware
- Clean, organized interface
Cons:
- Limited customization options in free version
- No alerting or notification features
- Basic graphing capabilities
- Pro version required for advanced features
Best for: Users who need simple, reliable system monitoring during stress tests
3. AIDA64

AIDA64 represents the professional standard for comprehensive system testing. During my years of building and testing custom PCs, I’ve relied on AIDA64’s 30-day trial for thorough system validation. This tool goes beyond simple stress testing – it provides detailed hardware analysis, stability testing, and benchmarking all in one package.
The system stability test is where AIDA64 truly excels. You can simultaneously stress your CPU, GPU, memory, and storage drives while monitoring temperatures and performance metrics. I’ve used this feature to validate new PC builds and identify compatibility issues before they become problems. The ability to test multiple components at once saves significant time compared to running separate tests for each component.
What sets AIDA64 apart is its detailed hardware reporting. Before running stress tests, you get comprehensive information about every component in your system. This data helps you understand your hardware’s specifications and thermal limits. The benchmark database allows you to compare your system’s performance against similar configurations, which is invaluable for identifying underperforming components.
The stability testing algorithms are particularly sophisticated. AIDA64 uses various mathematical computations and memory access patterns to stress different aspects of your system. I’ve found it excellent for detecting marginal stability issues that other tools might miss. The detailed logging and reporting features make it easy to document your system’s performance for future reference.
Key Features:
- Comprehensive system information and hardware detection
- Multi-component simultaneous stress testing
- Advanced stability testing algorithms
- Real-time temperature and voltage monitoring
- Benchmark database for performance comparisons
- Detailed reporting and logging capabilities
Pros:
- Professional-grade accuracy and reliability
- Comprehensive testing of all system components
- Excellent hardware detection and reporting
- Sophisticated stress testing algorithms
- Regular updates for new hardware support
Cons:
- Free trial limited to 30 days
- It can be overwhelming for beginners
- Resource-intensive during full system tests
- Requires purchase for continued use
Best for: PC builders, system integrators, and users who need professional-level system analysis
4. MAXON Cinebench R23

Cinebench R23 has become my standard for CPU performance testing because it uses real-world rendering tasks that actually stress your processor the way demanding applications do. Unlike synthetic benchmarks, Cinebench simulates actual 3D rendering work, making it perfect for testing whether your CPU can handle video editing, 3D modeling, or other creative tasks.
I particularly appreciate how Cinebench tests both single-core and multi-core performance. Modern applications use multiple CPU cores differently, and this tool helps you understand how your processor performs in both scenarios. The single-core test is great for checking gaming performance, while the multi-core test simulates heavy workloads like video encoding or 3D rendering.
The stress test mode with minimum runtime settings makes Cinebench excellent for stability testing. You can set it to run for extended periods, which helps identify thermal throttling or instability issues that only appear under sustained load. I’ve used this feature to validate CPU overclocks and ensure cooling systems can handle prolonged high-performance tasks.
What makes Cinebench particularly valuable is its industry acceptance. The scores are widely recognized and compared across the PC community. This means you can easily benchmark your system against similar configurations and identify potential performance issues. The regular updates ensure compatibility with the latest processors and rendering technologies.
Key Features:
- Real-world 3D rendering workload simulation
- Separate single-core and multi-core testing
- Stress test mode with configurable runtime
- Industry-standard benchmark scores
- Support for latest CPU architectures
- Cross-platform compatibility
Pros:
- Uses realistic workloads instead of synthetic tests
- Industry-standard benchmark with wide recognition
- Free and regularly updated
- Easy to understand results and scoring
- Excellent for both performance testing and stress testing
Cons:
- Only tests CPU performance, not other components
- Limited customization options
- Requires significant CPU resources during testing
- No built-in temperature monitoring
Best for: Content creators, video editors, and users who need realistic CPU performance validation
5. FurMark

FurMark is the most intense GPU stress test I’ve ever used, and I approach it with both respect and caution. This tool creates a demanding 3D scene with complex fur rendering that pushes graphics cards harder than any game or application you’ll encounter. I’ve seen it reveal GPU instabilities that other stress tests completely missed.
The infamous “donut of doom” – FurMark’s spinning torus covered in fur – has become legendary in the PC community for good reason. It stresses your GPU’s compute units, memory, and power delivery systems simultaneously. I always monitor temperatures closely when running FurMark because it can quickly push GPUs to their thermal limits. I’ve witnessed graphics cards reach temperatures 10-15°C higher with FurMark than with demanding games.
What makes FurMark particularly useful is its ability to quickly identify GPU stability issues. If your graphics card has marginal overclocks, insufficient cooling, or hardware problems, FurMark will expose them within minutes. I use it as a final validation tool after overclocking, but always with careful temperature monitoring and conservative time limits.
However, I must emphasize that FurMark is extremely demanding – arguably more demanding than any real-world application. Some manufacturers even detect FurMark and reduce GPU clocks to prevent damage. While this makes it excellent for stress testing, the results aren’t representative of gaming or professional workload performance. I recommend using it cautiously and never leaving it running unattended.
Key Features:
- Extremely demanding GPU stress testing
- Real-time temperature and performance monitoring
- Customizable resolution and anti-aliasing settings
- GPU burn-in testing capabilities
- Artifact detection and stability validation
- Lightweight with minimal CPU usage
Pros:
- Most demanding GPU stress test available
- Quickly identifies stability and cooling issues
- Simple, focused interface
- Free and regularly updated
- Excellent for validating GPU overclocks
Cons:
- Extremely intensive – can damage inadequately cooled GPUs
- Not representative of real-world application loads
- Some GPU manufacturers detect and throttle during FurMark
- Requires constant temperature monitoring
Best for: Advanced users testing GPU stability limits and cooling system effectiveness
6. 3DMark

3DMark has been my go-to gaming performance benchmark for over a decade because it simulates real gaming scenarios better than any other tool. When I want to know how my system will perform in actual games, 3DMark provides the most accurate predictions. The various test suites target different performance levels, from basic integrated graphics to high-end gaming systems.
The Time Spy and Fire Strike tests are particularly valuable for modern gaming systems. Time Spy uses DirectX 12 and targets 1440p gaming performance, while Fire Strike focuses on 1080p gaming with DirectX 11. I use these tests to validate system performance after upgrades and to identify potential bottlenecks. The detailed breakdowns show separate CPU and GPU scores, helping pinpoint performance limitations.
What sets 3DMark apart is its stress test mode. While the standard benchmarks run for a few minutes, the stress test loops the most demanding scenes for 20 iterations. I use this mode to verify system stability under realistic gaming loads. It’s much more representative of actual gaming stress than synthetic fur rendering or mathematical computations.
The online results database is incredibly valuable for system comparison and validation. You can compare your scores against thousands of similar systems to identify performance issues or validate upgrades. I’ve used this feature to help friends optimize their systems and identify underperforming components. The mobile app even lets you track your scores over time and share results with the community.
Key Features:
- Multiple test suites for different performance levels
- Realistic gaming scenario simulation
- Stress test mode with 20-iteration loops
- Separate CPU and GPU performance scoring
- Online results database for system comparison
- Regular updates for new graphics technologies
Pros:
- Most realistic gaming performance testing available
- Industry-standard benchmark widely recognized
- Excellent stress testing capabilities
- Comprehensive system performance analysis
- Strong community and database support
Cons:
- Full feature set requires paid version
- Large download size (several GB)
- Resource-intensive testing
- Limited customization in the free version
Best for: Gamers who want realistic performance testing and system validation
7. Unigine Heaven

Unigine Heaven holds a special place in my stress testing toolkit because of its perfect balance between visual appeal and technical rigor. The stunning fantasy environment with floating islands and detailed architecture makes GPU stress testing almost enjoyable to watch. I’ve spent hours running Heaven loops while monitoring system temperatures and stability.
The tessellation and advanced shading in Heaven stress different aspects of your GPU compared to other tests. While FurMark focuses on raw computational power, Heaven tests geometry processing, texture filtering, and shader performance. This makes it excellent for identifying GPU issues that might not appear in other stress tests. I’ve found it particularly good at revealing memory-related instabilities.
What makes Heaven invaluable for extended stress testing is its looping capability. You can run the benchmark continuously for hours, which is essential for identifying thermal issues and long-term stability problems. I typically run Heaven loops for 30-60 minutes after making GPU overclocks or system changes. The consistent workload helps identify thermal throttling and stability boundaries.
The customizable settings allow you to adjust the stress level for different testing scenarios. I use lower settings for quick stability checks and maximum settings for thorough stress testing. The real-time performance monitoring overlay shows frame rates, temperatures, and GPU usage without requiring additional monitoring software. This integrated approach simplifies the testing process and reduces system overhead.
Key Features:
- Beautiful 3D fantasy environment for visual stress testing
- Advanced tessellation and shader testing
- Continuous looping capability for extended testing
- Customizable quality settings and resolution
- Real-time performance monitoring overlay
- Cross-platform DirectX and OpenGL support
Pros:
- Visually appealing testing environment
- Excellent for extended stress testing sessions
- Good balance of realism and GPU stress
- Comprehensive graphics feature testing
- Free with full features available
Cons:
- Older graphics engine compared to newer alternatives
- Limited customization compared to professional tools
- Not as demanding as some specialized stress tests
- Interface could be more modern
Best for: Users who want attractive, extended GPU testing with realistic graphics workloads
8. OCCT
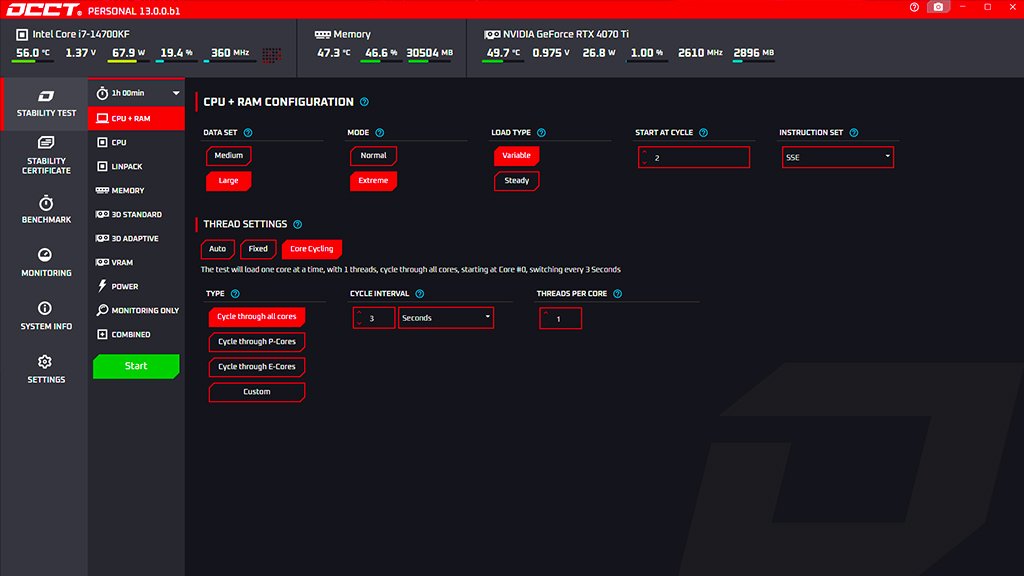
OCCT has been my secret weapon for comprehensive system stability testing for years. This French-developed tool combines the functionality of multiple specialized stress testers into one cohesive package. When I need to validate an entire system – CPU, GPU, RAM, and power supply – OCCT provides everything in a single, well-designed interface.
The real-time monitoring dashboard is absolutely outstanding. While running stress tests, you can simultaneously monitor temperatures, voltages, power consumption, and performance metrics for all system components. I’ve caught numerous stability issues using OCCT’s integrated monitoring that I might have missed with separate tools. The automatic error detection stops tests immediately when instability is detected, preventing potential hardware damage.
What makes OCCT particularly valuable is its per-core CPU testing capability. Modern processors have multiple cores that can behave differently under stress. OCCT can test individual cores or specific core combinations, which is excellent for identifying marginal CPU stability issues. I’ve used this feature to validate CPU overclocks and identify thermal issues with specific processor cores.
The power supply testing feature sets OCCT apart from most other stress testing tools. By simultaneously stressing CPU and GPU while monitoring power consumption and voltages, you can validate your PSU’s stability under realistic high-load conditions. This has helped me identify inadequate power supplies before they caused system crashes or component damage.
Key Features:
- Simultaneous CPU, GPU, RAM, and PSU testing
- Real-time monitoring of temperatures, voltages, and power
- Per-core CPU testing and monitoring
- Automatic error detection and test termination
- Variable GPU load testing with customizable parameters
- Comprehensive reporting and logging capabilities
Pros:
- All-in-one testing solution for complete system validation
- Excellent real-time monitoring and error detection
- User-friendly interface despite advanced capabilities
- Regular updates and active development
- Completely free with no limitations
Cons:
- Can be resource-intensive during full system tests
- Advanced features may overwhelm beginners
- Limited customization for specific testing scenarios
- Documentation could be more comprehensive
Best for: System builders and overclockers who need comprehensive system validation
9. Linpack Xtreme
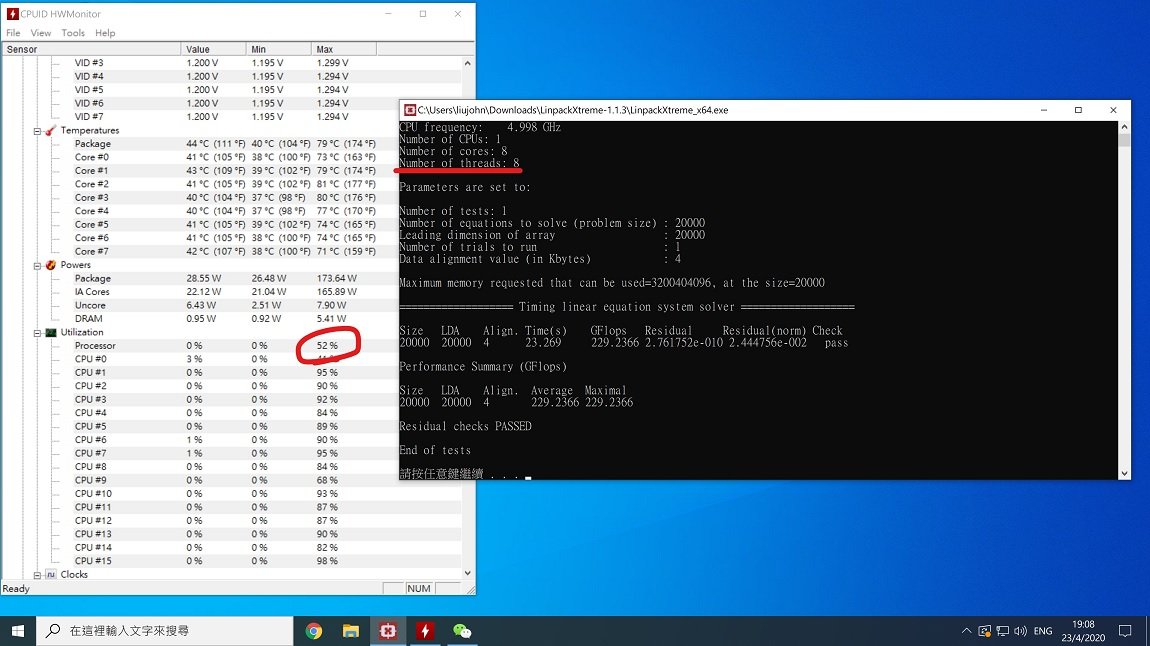
Linpack Xtreme represents the pinnacle of intensive CPU stress testing. Based on Intel’s Linpack mathematical library, this tool pushes processors harder than almost any real-world application. I use it specifically for validating extreme CPU overclocks and testing cooling system effectiveness under maximum thermal load.
The mathematical computations in Linpack Xtreme stress every aspect of your CPU’s architecture – integer units, floating-point units, cache systems, and memory controllers. I’ve seen it identify CPU instabilities that other stress tests completely missed. The high-precision calculations require perfect stability; even minor timing issues or voltage problems will cause immediate failures.
What makes Linpack Xtreme particularly challenging is its thermal generation. This tool produces more heat per watt than most applications your CPU will ever encounter. I use it specifically to validate cooling systems and identify thermal throttling thresholds. However, I always limit test duration and monitor temperatures closely because the extreme heat generation can potentially damage inadequately cooled processors.
The customizable test parameters allow you to adjust the stress level and memory usage. I typically start with smaller problem sizes and shorter durations, gradually increasing the intensity as I validate system stability. The detailed performance metrics help identify not just stability issues but also performance optimization opportunities for memory-intensive applications.
Key Features:
- Extreme mathematical computation stress testing
- High precision calculations requiring perfect CPU stability
- Customizable problem sizes and test duration
- Memory bandwidth and latency testing
- Temperature and performance monitoring
- Multiple threading support for multi-core processors
Pros:
- Most demanding CPU stress test available
- Excellent for validating extreme overclocks
- Quickly identifies subtle stability issues
- Comprehensive CPU architecture testing
- Free and lightweight
Cons:
- Extremely demanding – can cause thermal damage
- Not representative of typical application loads
- Requires expert-level cooling and monitoring
- Limited to CPU testing only
Best for: Extreme overclockers and users testing CPU thermal limits
10. MemTest86
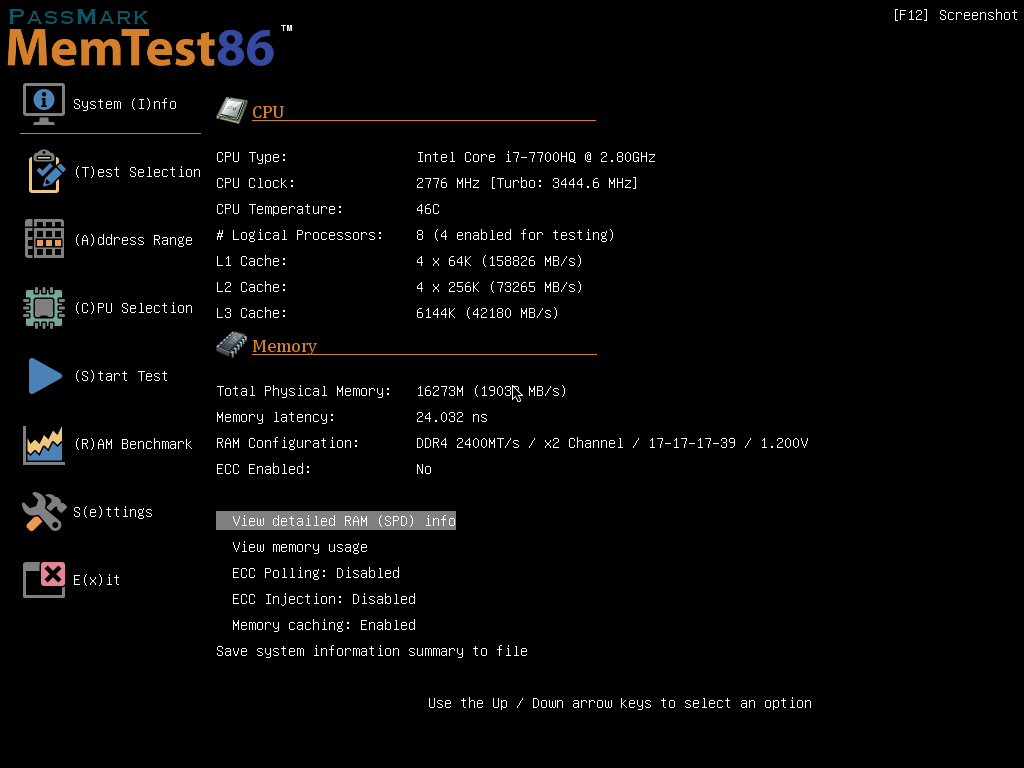
MemTest86 has saved me hours of troubleshooting. It’s great for finding RAM problems. It tests your system memory without Windows or other software getting in the way.
The comprehensive testing algorithms in MemTest86 check your RAM’s functionality. It tests data retention, address line integrity, and timing issues. Running the full test takes several hours, depending on your RAM size.
MemTest86 is special because it works independently. You make a bootable USB drive and run tests before Windows starts. This way, you get accurate results without software interference. I’ve found faulty RAM modules that worked fine under Windows but failed MemTest86’s tests.
The detailed error reporting helps pinpoint memory problems. It shows different error patterns for various issues. This helps me figure out if the problem is with a specific module or a bigger system issue. The test results guide my replacement decisions and troubleshooting steps.
Key Features:
- Boot-independent memory testing without OS interference
- Comprehensive testing algorithms for all failure modes
- Detailed error reporting with specific memory addresses
- Support for all memory types including DDR5
- USB bootable operation for maximum compatibility
- Professional-grade accuracy and reliability
Pros:
- Most accurate RAM testing available
- Eliminates false positives from software interference
- Industry standard for memory validation
- Comprehensive error analysis and reporting
- Free version covers most testing needs
Cons:
- Requires creating bootable USB drive
- A text-based interface may seem outdated
- Complete testing takes several hours
- Advanced features require paid version
Best for: Anyone experiencing system instability, crashes, or suspected memory problems
11. GPU-Z
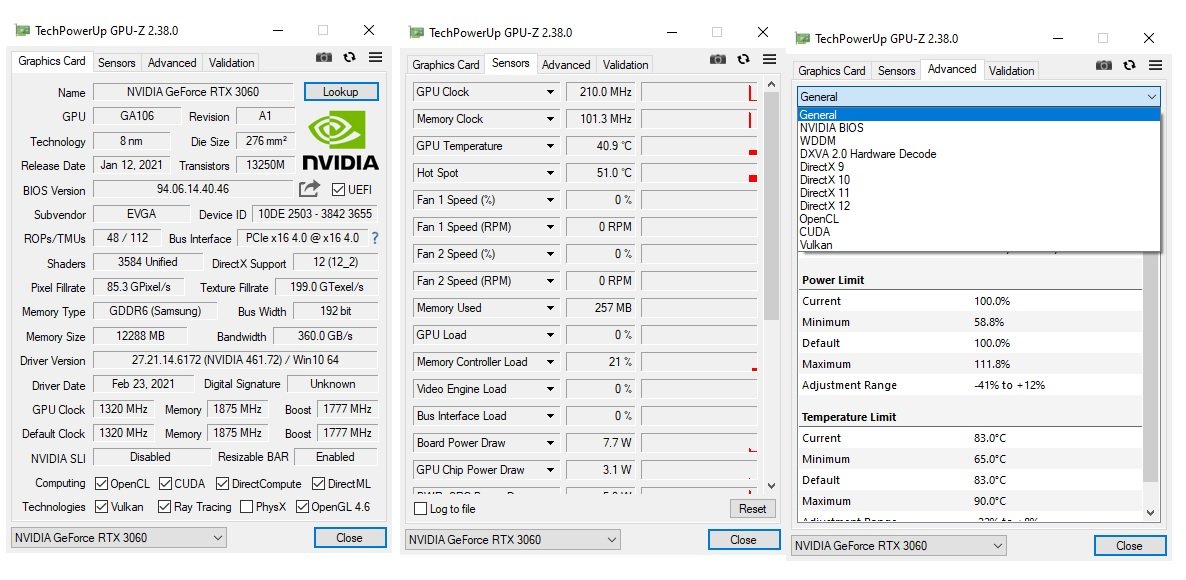
GPU-Z has been my essential companion for GPU monitoring and information throughout years of graphics card testing and overclocking. While not a stress test itself, this lightweight tool provides invaluable real-time monitoring data during stress testing sessions. The detailed hardware information helps you understand your graphics card’s specifications and capabilities before pushing it to its limits.
The real-time monitoring capabilities in GPU-Z are exceptionally detailed. You can track GPU clocks, memory frequency, temperature, voltage, power consumption, and fan speeds with millisecond precision. I keep GPU-Z running during all my stress testing sessions to monitor how my graphics card responds to different workloads. The logging feature allows you to record performance data for later analysis.
What sets GPU-Z apart is its hardware validation accuracy. The tool correctly identifies graphics card specifications, memory types, BIOS versions, and even detects fake or modified cards. I use this information to verify hardware authenticity and understand thermal and power limits before stress testing. The sensor accuracy has helped me identify several hardware issues over the years.
The built-in render test provides a lightweight stress testing option. While not as demanding as dedicated stress testing tools, it’s perfect for quick stability checks and monitoring system response to GPU load changes. I use this feature for initial testing before moving on to more intensive stress tests.
Key Features:
- Detailed GPU hardware information and specifications
- Real-time monitoring of all GPU sensors and parameters
- Hardware validation and authenticity verification
- Built-in lightweight render test for basic stress testing
- Performance logging and data export capabilities
- Support for all modern graphics cards
Pros:
- Most accurate GPU information and monitoring available
- Lightweight with minimal system impact
- Excellent sensor accuracy and reliability
- Regular updates for new graphics cards
- Completely free with full features
Cons:
- Not a comprehensive stress testing solution
- Built-in render test is relatively light
- Interface focused on technical users
- Limited stress testing capabilities
Best for: Users who need detailed GPU monitoring during stress testing and system validation
12. Prime95
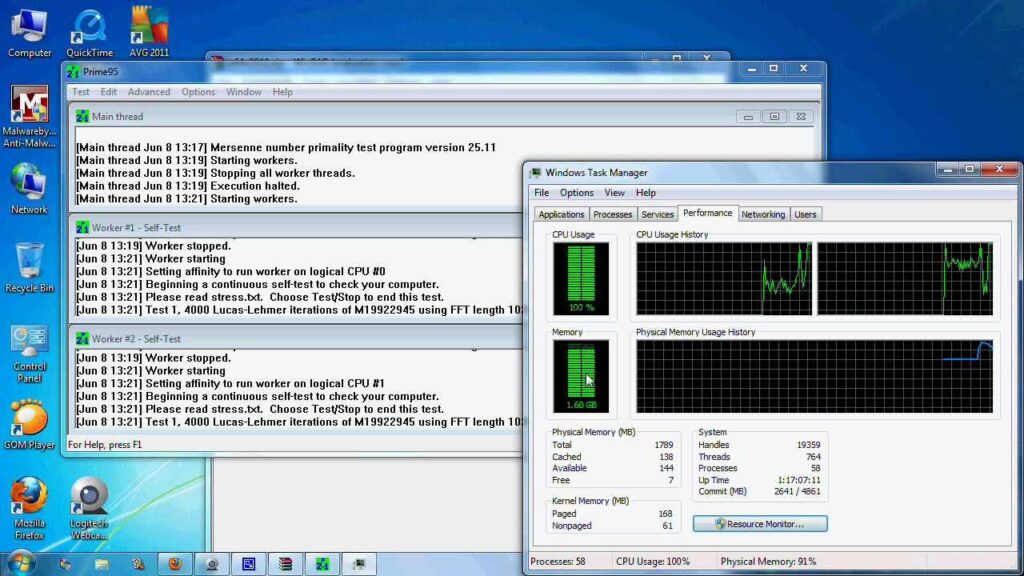
Prime95 represents the classic approach to CPU stress testing and has been my trusted tool for processor validation for over a decade. Originally designed for finding Mersenne prime numbers, this mathematical powerhouse has become the gold standard for CPU stability testing among overclockers and system builders worldwide.
The mathematical computations in Prime95 stress your CPU in ways that closely simulate intensive real-world applications. The Fast Fourier Transform (FFT) calculations used in the tests stress all aspects of your processor – cores, cache systems, memory controllers, and thermal management. I’ve found it particularly effective at identifying marginal overclocks that might appear stable in other tests but fail under Prime95’s rigorous workload.
What makes Prime95 special is its configurable test types. The Small FFT test focuses primarily on CPU cores and generates maximum heat, making it perfect for thermal testing. The Large FFT test stresses both CPU and memory systems, while the Blend test provides a balanced workload. I use different test types depending on what aspect of system stability I’m validating.
The torture test mode allows you to run continuous stress testing for extended periods. I typically run Prime95 for several hours when validating new overclocks or system builds. The tool’s ability to detect even subtle calculation errors makes it incredibly sensitive to system instability. If your system passes several hours of Prime95 testing, you can be confident in its stability under demanding workloads.
Key Features:
- Multiple test types focusing on different system aspects
- Configurable FFT sizes and test parameters
- Continuous torture test mode for extended validation
- Extremely sensitive error detection capabilities
- Multi-core and multi-threading support
- Minimal system resource overhead
Pros:
- Industry-standard CPU stress testing tool
- Highly sensitive to system instability
- Multiple test configurations for different scenarios
- Completely free and regularly updated
- Lightweight and reliable
Cons:
- Text-based interface may seem outdated
- Very demanding – can cause system overheating
- Limited to CPU testing only
- No built-in temperature monitoring
Best for: Overclockers and system builders who need proven CPU stability validation
13. IntelBurn Test
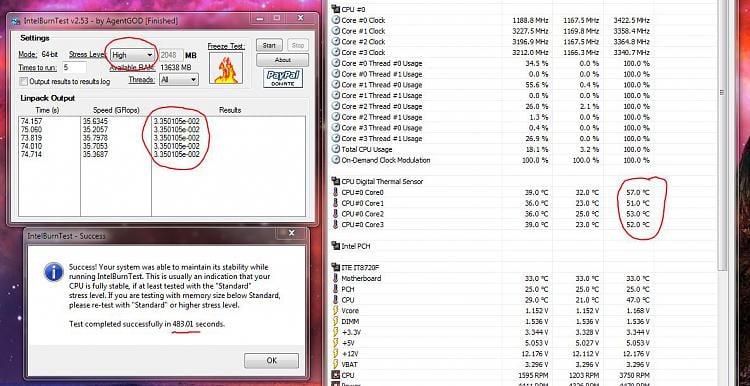
IntelBurn Test has been my go-to tool for rapid CPU stability validation when time is limited. Based on Intel’s Linpack library, this tool pushes processors to their absolute limits in much shorter timeframes than traditional stress tests. I’ve found it particularly useful for quickly identifying obviously unstable overclocks before investing time in longer testing sessions.
The intense computational workload in IntelBurn Test generates more heat and stress per minute than almost any other CPU test. A 10-minute IntelBurn Test session often reveals stability issues that might take hours to surface with other tools. However, this intensity comes with risks – I’ve seen it cause thermal shutdowns on inadequately cooled systems, so careful temperature monitoring is essential.
What makes IntelBurn Test valuable for overclock validation is its ability to quickly separate stable from unstable configurations. The mathematical precision required by the Linpack algorithms means even minor timing or voltage issues cause immediate failures. I use it as a preliminary screening tool before moving on to longer stability tests with Prime95 or AIDA64.
The configurable stress levels allow you to adjust testing intensity based on your cooling capacity and risk tolerance. I typically start with lower stress levels and gradually increase intensity while monitoring temperatures. The detailed performance metrics help identify not just stability issues but also thermal throttling and performance degradation under extreme loads.
Key Features:
- Rapid CPU stress testing based on Intel Linpack
- Configurable stress levels and test duration
- Extreme heat generation for thermal testing
- Quick identification of CPU instability
- Performance benchmarking capabilities
- Support for multi-core processors
Pros:
- Very fast identification of CPU instability
- Extremely demanding stress testing
- Configurable intensity levels
- Lightweight and easy to use
- Free and reliable
Cons:
- Can cause thermal damage if cooling is inadequate
- Very intense – not representative of typical loads
- Limited testing duration options
- Requires careful temperature monitoring
Best for: Overclockers who need rapid CPU stability screening
14. Superposition
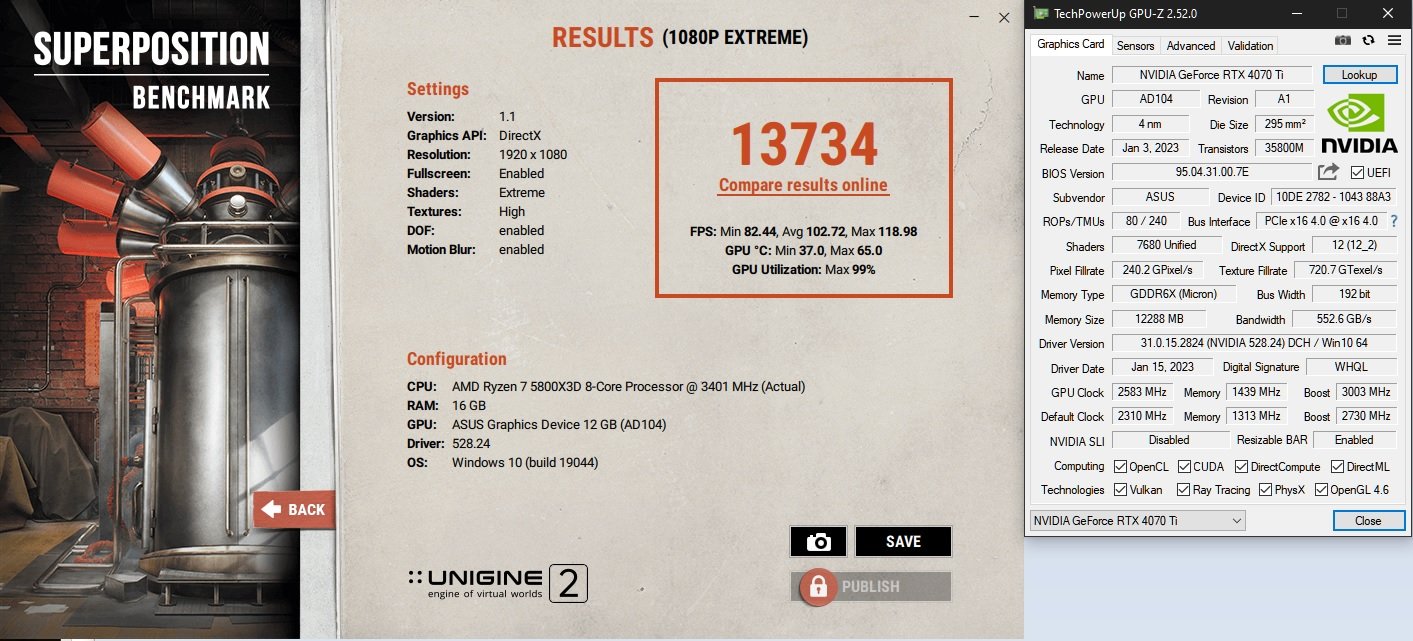
Unigine Superposition represents the modern evolution of GPU stress testing with cutting-edge graphics technologies. As the successor to Heaven, Superposition incorporates advanced rendering techniques like dynamic lighting, interactive environments, and modern shader effects. I use it specifically for testing how modern graphics cards handle contemporary game engines and rendering techniques.
The interactive stress testing environment sets Superposition apart from static benchmarks. You can explore the detailed steampunk laboratory while monitoring GPU performance, temperatures, and stability. This interactive approach helps identify GPU issues that might not appear in scripted benchmark sequences. The dynamic lighting and particle effects stress different aspects of your graphics card’s capabilities.
What makes Superposition particularly valuable for modern GPU testing is its use of current rendering technologies. The advanced shaders, tessellation, and lighting techniques closely match what you’ll encounter in recent games. I’ve found it excellent for validating GPU performance in realistic gaming scenarios rather than synthetic stress tests that don’t represent actual gaming workloads.
The extreme preset options push even high-end graphics cards to their limits. The 8K optimization preset tests GPU memory bandwidth and processing power in ways that simulate future gaming requirements. I use these extreme settings specifically for thermal testing and identifying the absolute performance boundaries of graphics cards.
Key Features:
- Interactive 3D environment with dynamic stress testing
- Modern rendering techniques including advanced shaders
- Multiple quality presets from basic to extreme 8K
- VR mode for virtual reality performance testing
- Stress test mode with continuous looping
- Cross-platform DirectX and OpenGL support
Pros:
- Modern graphics technology testing
- Interactive environment more engaging than static tests
- Realistic representation of current gaming workloads
- Multiple testing scenarios and quality levels
- Free with comprehensive features
Cons:
- Requires modern graphics card for full feature testing
- Larger download size than simpler stress tests
- More resource intensive than basic GPU tests
- Limited customization options
Best for: Users with modern graphics cards who want realistic gaming performance validation
15. Y-Cruncher
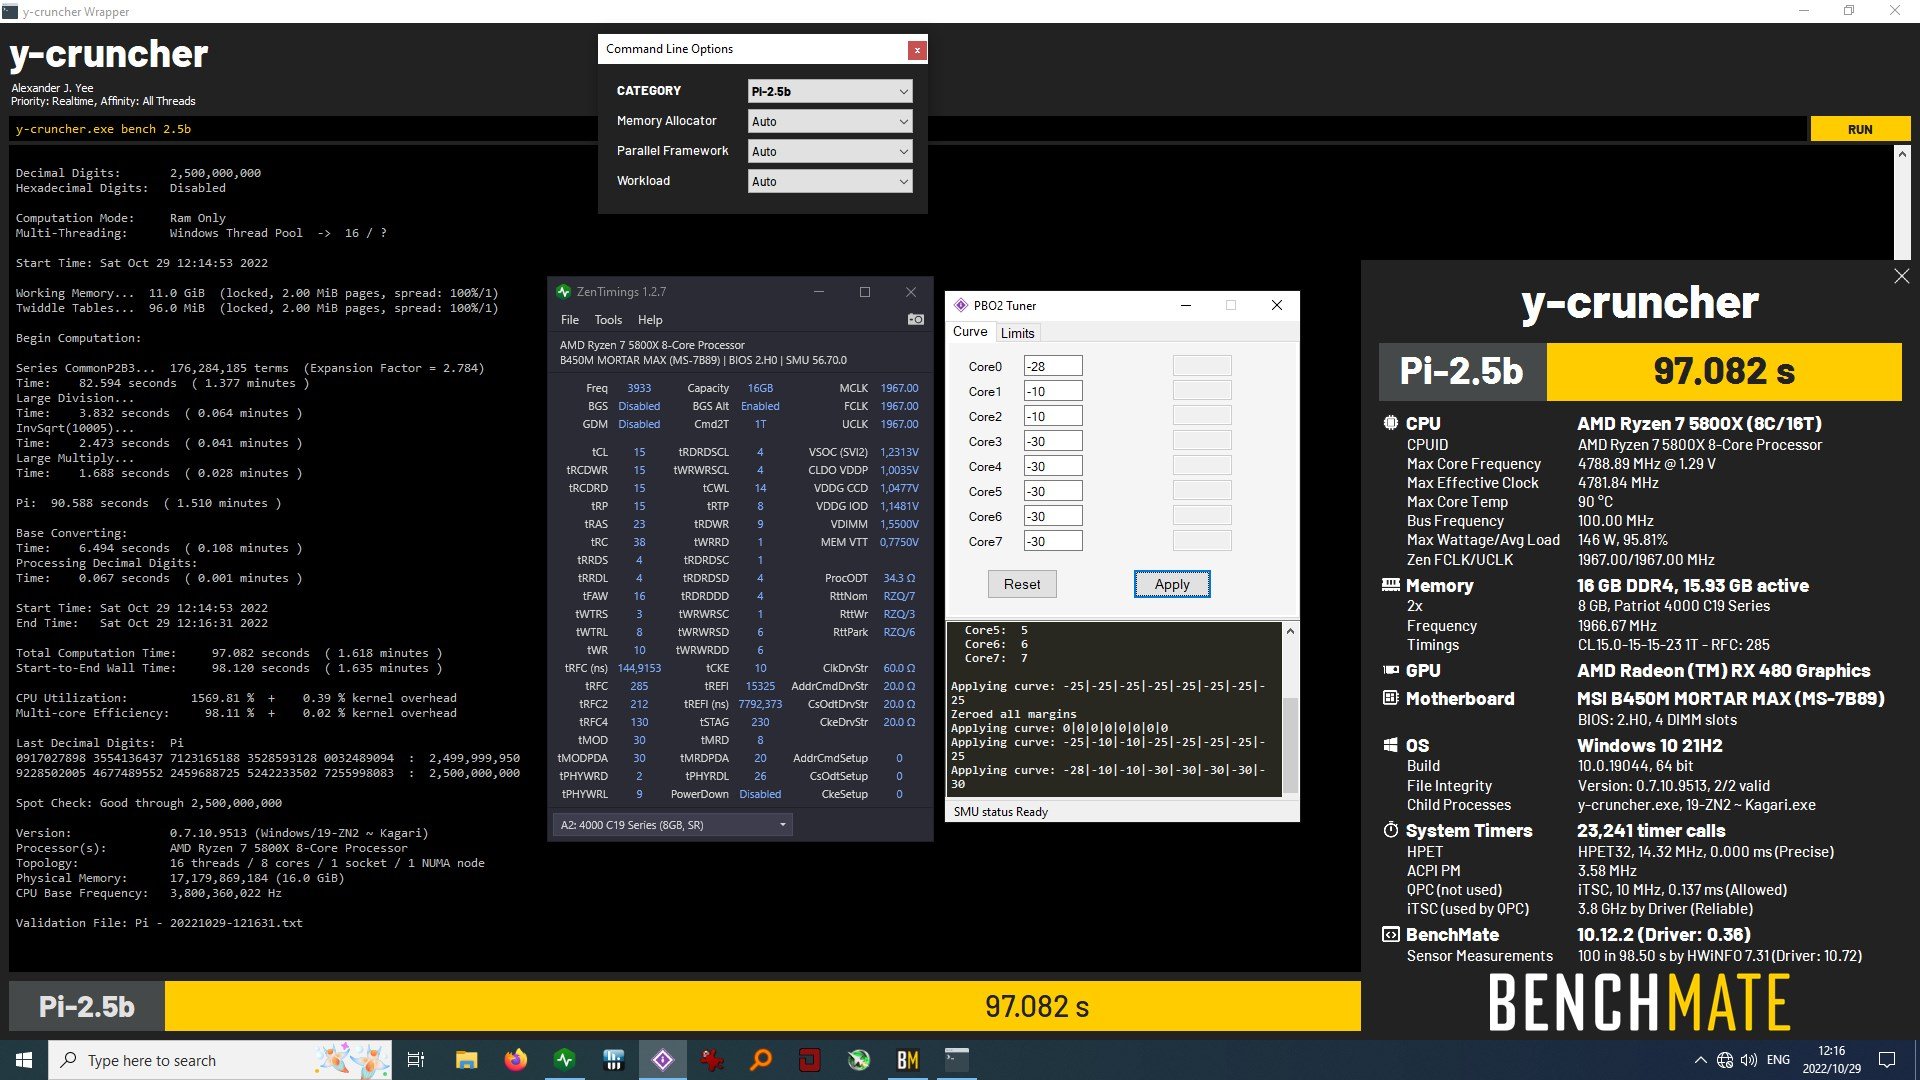
Y-Cruncher rounds out my stress testing arsenal as the ultimate mathematical computation stress test. This specialized tool calculates mathematical constants like Pi to billions of decimal places, creating an incredibly demanding workload that stresses CPU, memory, and storage systems simultaneously. I use it specifically for validating extreme system configurations and identifying subtle stability issues.
The multi-threaded mathematical calculations in Y-Cruncher create workloads that are virtually impossible to encounter in normal computing. The precision requirements mean even the smallest system instability causes calculation errors. I’ve used it to identify marginal RAM timings, CPU voltage issues, and even storage system problems that other stress tests completely missed.
What makes Y-Cruncher unique is its comprehensive system stress. Unlike tools that focus on specific components, Y-Cruncher simultaneously stresses CPU cores, memory bandwidth, cache systems, and storage throughput. The calculations require massive amounts of temporary storage, which tests your storage system’s sustained performance and reliability under heavy load.
The configurable calculation precision allows you to adjust stress levels and test duration. I typically start with smaller calculations and gradually increase precision to test different aspects of system stability. The detailed progress reporting and error checking help identify exactly when and where system instability occurs, making it invaluable for diagnosing complex stability issues.
Key Features:
- Extreme mathematical computation stress testing
- Simultaneous CPU, memory, and storage system testing
- Configurable calculation precision and complexity
- Multi-threaded processing with optimized algorithms
- Comprehensive error detection and reporting
- Advanced system stability validation
Pros:
- Most comprehensive system stress testing available
- Extremely sensitive to all types of system instability
- Tests components other tools don’t stress
- Highly configurable test parameters
- Completely free and actively developed
Cons:
- Extremely demanding – can stress systems beyond safe limits
- Complex interface requiring technical knowledge
- Very long test duration for complete validation
- Not representative of typical computing workloads
Best for: Extreme system builders and overclockers who need ultimate stability validation
How to Use These Tools Safely
Based on my years of experience with stress testing, here are the critical safety guidelines you should follow:
Temperature Monitoring
Always monitor your component temperatures during stress testing. CPU temperatures should stay below 85°C, and GPU temperatures should remain under 90°C for most modern hardware. I recommend using HWMonitor or similar monitoring tools alongside your stress tests.
Start Conservative
Begin with shorter test durations and lower intensity settings. I typically start with 5-10 minute tests before moving to longer validation sessions. This approach helps you identify obvious problems before risking hardware damage.
Adequate Cooling
Ensure your cooling system can handle the increased thermal load. Stress tests generate more heat than normal applications, so verify that your CPU cooler and case ventilation are adequate before running intensive tests.
Power Supply Considerations
Stress testing increases power consumption significantly. Make sure your power supply has adequate capacity and clean power delivery. Inadequate PSUs can cause system instability that appears to be component-related but is actually power-related.
When to Stress Test Your PC
After Hardware Changes
Always stress test after installing new components, changing overclocks, or modifying cooling systems. This validation helps ensure your changes haven’t introduced stability issues.
Periodic Maintenance
I recommend stress testing every 6-12 months as part of regular system maintenance. This helps identify developing issues before they cause problems. For more maintenance tips, check our guide on how to activate Windows 10 permanently.
Before Important Work
If you’re starting a major project or need guaranteed system stability, run stress tests beforehand to ensure your system won’t crash during critical work.
Troubleshooting Crashes
When experiencing system instability, crashes, or blue screens, stress testing helps identify which component is causing problems.
Interpreting Stress Test Results
Successful Tests
A successful stress test means your system completed the test without errors, crashes, or excessive temperatures. However, passing one test doesn’t guarantee overall stability – I recommend running multiple different tests for comprehensive validation.
Failed Tests
Test failures can indicate various issues:
- Immediate crashes: Usually indicate serious stability problems
- Gradual performance degradation: Often suggests thermal throttling
- Calculation errors: Typically indicate memory or CPU issues
- Display artifacts: Usually point to GPU problems
Temperature Analysis
Monitor temperature trends during testing. Temperatures should stabilize at safe levels and not continue climbing throughout the test. Continuously rising temperatures suggest inadequate cooling.
Common Stress Testing Mistakes to Avoid
Running Extreme Tests Without Preparation
Don’t jump directly to the most intensive stress tests. I’ve seen users damage hardware by running FurMark or Linpack Xtreme without adequate cooling or preparation.
Ignoring Temperature Warnings
Never ignore high temperature warnings during stress testing. Component damage can occur quickly once safe temperature limits are exceeded.
Testing for Too Long Initially
Don’t run 24-hour stress tests immediately. Start with shorter durations and gradually increase testing time as you verify system stability and cooling adequacy.
Not Testing Different Scenarios
Don’t rely on a single stress test tool. Different tools stress different aspects of your system, so comprehensive testing requires multiple approaches.
Building Your Stress Testing Routine
Basic Testing Protocol
For most users, I recommend this basic testing sequence:
- Start with HWMonitor for baseline temperature monitoring
- Run Cinebench R23 for CPU validation (15-30 minutes)
- Use MSI Afterburner with Unigine Heaven for GPU testing (30-60 minutes)
- Run MemTest86 overnight for comprehensive memory testing
Advanced Testing Protocol
For enthusiasts and overclockers:
- Comprehensive monitoring with AIDA64 or OCCT
- Extended Prime95 testing for CPU validation (2-4 hours)
- Multiple GPU stress tests including 3DMark and FurMark
- Y-Cruncher for ultimate system validation
- Extended MemTest86 testing with multiple passes
Professional Validation
For system builders and professionals:
- Full AIDA64 stability testing suite
- Industry-standard benchmarks like 3DMark and Cinebench
- Extended stress testing with temperature and power monitoring
- Comprehensive documentation and reporting
Advanced Tips for Power Users
Overclocking Validation
When validating overclocks, use multiple stress tests in sequence. What passes Prime95 might fail in Linpack Xtreme, and vice versa. I always test multiple scenarios before considering an overclock stable.
Component-Specific Testing
Use specialized tools for specific components:
- CPU: Prime95, Linpack Xtreme, Cinebench
- GPU: FurMark, 3DMark, Unigine tests
- RAM: MemTest86, Y-Cruncher
- Storage: CrystalDiskMark, ATTO Disk Benchmark
Thermal Testing
For thermal validation, use tools that generate maximum heat:
- CPU: Small FFT Prime95, Linpack Xtreme
- GPU: FurMark at maximum settings
- System: AIDA64 full system stress test
Long-term Stability Testing
For mission-critical systems, run extended tests:
- 24-hour Prime95 blend test for CPU/memory
- 12-hour GPU stress testing with temperature monitoring
- Multiple MemTest86 passes for comprehensive memory validation
Troubleshooting Common Issues
System Crashes During Testing
Crashes usually indicate:
- Insufficient power supply capacity
- Overheating components
- Unstable overclocks
- Faulty hardware
Gradual Performance Degradation
Declining performance suggests:
- Thermal throttling due to inadequate cooling
- Power limit throttling
- Background processes interfering
Inconsistent Test Results
Variable results may indicate:
- Marginal system stability
- Temperature-dependent issues
- Power supply problems
- Intermittent hardware faults
For more troubleshooting help, check our comprehensive guide on best Windows repair tools.
Conclusion
Stress testing your PC is essential for maintaining system reliability and performance in 2025. The tools covered in this guide provide comprehensive testing capabilities for every component in your system. Remember to always prioritize safety by monitoring temperatures and starting with conservative test settings.
Regular stress testing helps you catch problems early, validate system upgrades, and ensure your PC can handle demanding workloads. Whether you’re a casual user wanting basic system validation or an extreme overclocker pushing hardware limits, these 15 tools provide everything you need for thorough PC stress testing.
Start with the basic tools like MSI Afterburner and HWMonitor, then gradually incorporate more advanced testing as you gain experience. Your computer is a significant investment – protect it with regular stress testing and monitoring.
For additional PC maintenance tips, explore our guides on best free driver updaters and bandwidth monitor software for Windows.
FAQ About PC Stress Testing Tools
What is stress testing and why should I do it?
Stress testing pushes your computer’s components to their limits to find weak spots and prevent problems like overheating or crashes. It’s important because it helps you catch issues early before they cause expensive damage or lost work.
Do I need technical knowledge to use these tools?
Most basic stress testing tools like MSI Afterburner and HWMonitor are designed for everyday users. Start with the simpler tools and learn as you go. However, extreme tools like FurMark and Linpack Xtreme require more experience and careful monitoring.
Can stress testing damage my computer?
When done properly with temperature monitoring, stress testing is safe. However, extreme tools can damage inadequately cooled systems. Always monitor temperatures and start with conservative settings.
How often should I stress test my PC?
I recommend stress testing after any hardware changes, every 6-12 months for maintenance, and whenever you experience system problems. Regular testing helps catch issues early.
Are these tools really free?
Yes, all the basic versions of these tools are free. Some offer paid versions with extra features, but the free versions provide everything most users need for stress testing.
How do I know if my stress test results are good?
Good results mean your system completes tests without crashes, errors, or excessive temperatures (CPU under 85°C, GPU under 90°C). If tests fail or temperatures get too high, you may have cooling or stability issues.
Which tool should I start with as a beginner?
Start with HWMonitor for temperature monitoring and MSI Afterburner for basic GPU testing. These tools are user-friendly and provide good introduction to stress testing concepts.
Can I run multiple stress tests at the same time?
Generally, no. Running multiple stress tests simultaneously can overload your system and make it difficult to identify which component is causing problems. Test components separately for best results.
You May Also Like
 Best Software
Top 10 Free & Open Source Inventory Management Software in 2026: A Comprehensive Buyer’s Guide With Real-World Data
 SaaS
SaaS
11 Best VoIP Call Center Solutions for Small Business 2026 (Comparison Guide)
 Best Software
6 Best Software to Record Mouse and Keyboard Actions and Automate Repetitive Tasks
 Best Software
Jira vs Hive: Which Project Management Tool is Right for Your Team?
 Best Software
8 Best Free Registry Cleaners Tools to Clean Junk and Registry on Windows PC
 Best Software
12 Top Plumbing Management Software Solutions for 2026
 Best Software
ServiceTitan Pricing Explained: How Much Does ServiceTitan Cost for Your Business?
 Best Software
12 Best Construction Project Management Software For Your Businesses
 Best Software